События и фильтры в WordPress. PHP и формы Как избежать неприятностей, связанных с PHP _SELF
4 years ago
Do-while loops can also be used inside other loops, for example:
// generating an array with random even numbers between 1 and 1000
$numbers
= array();
$array_size
=
10
;
// for loop runs as long as 2nd condition evaluates to true
for ($i
=
0
;
$i
<
$array_size
;
$i
++) {
// always executes (as long as the for-loop runs)
do {
$random
=
rand
(1
,
1000
);
// if the random number is even (condition below is false), the do-while-loop execution ends
// if it"s uneven (condition below is true), the loop continues by generating a new random number
} while (($random
%
2
) ==
1
);
// even random number is written to array and for-loop continues iteration until original condition is met
$numbers
=
$random
;
}
// sorting array by alphabet
Asort ($numbers );
// printing array
Echo "
" ;" ;
print_r ($numbers );
echo "
?>
12 years ago
There is one major difference you should be aware of when using the do--while loop vs. using a simple while loop: And that is when the check condition is made.
In a do--while loop, the test condition evaluation is at the end of the loop. This means that the code inside of the loop will iterate once through before the condition is ever evaluated. This is ideal for tasks that need to execute once before a test is made to continue, such as test that is dependant upon the results of the loop.
Conversely, a plain while loop evaluates the test condition at the begining of the loop before any execution in the loop block is ever made. If for some reason your test condition evaluates to false at the very start of the loop, none of the code inside your loop will be executed.
2 years ago
The last example on this page is simply abuse of the `break` keyword. Also, the suggestion to use `goto` if you don"t understand the abuse of `break` is unsettling. (See the manual page for `goto` for more than enough reasons not to use it.)
The final example is generally better expressed using a typical if-else statement.
if ($i
<
5
) {
echo
"i is not big enough"
;
} else {
$i
*=
$factor
;
If ($i
>=
$minimum_limit
) {
echo
"i is ok"
;
/* process i */
}
}
?>
This version is easier to read and understand. And arguments for code golf are invalid as well as this version is 3 lines shorter.
In conclusion, although you can certainly write code that abuses the `break` keyword, you shouldn"t in practice. Keep the code easy to read and understand for whoever inherits your code. And remember, code is for humans not computers.
10 years ago
I"m guilty of writing constructs without curly braces sometimes... writing the do--while seemed a bit odd without the curly braces ({ and }), but just so everyone is aware of how this is written with a do--while...
a normal while:
while ($isValid
)
$isValid
=
doSomething
($input
);
?>
a do--while:
do
$isValid
=
doSomething
($input
);
while ($isValid
);
?>
Also, a practical example of when to use a do--while when a simple while just won"t do (lol)... copying multiple 2nd level nodes from one document to another using the DOM XML extension
# open up/create the documents and grab the root element
$fileDoc
=
domxml_open_file
("example.xml"
);
// existing xml we want to copy
$fileRoot
=
$fileDoc
->
document_element
();
$newDoc
=
domxml_new_doc
("1.0"
);
// new document we want to copy to
$newRoot
=
$newDoc
->
create_element
("rootnode"
);
$newRoot
=
$newDoc
->
append_child
($newRoot
);
// this is the node we want to copy to
# loop through nodes and clone (using deep)
$child
=
$fileRoot
->
first_child
();
// first_child must be called once and can only be called once
do
$newRoot
->
append_child
($child
->
clone_node
(true
));
// do first, so that the result from first_child is appended
while ($child
=
$child
->
next_sibling
());
// we have to use next_sibling for everything after first_child
?>
Создает событие (зацепку для произвольной функции). Чтобы функция сработала в момент события её нужно подключить к этому событию с помощью функции add_action() .
Кроме событий в WP есть еще фильтры (filters), принцип работы такой же. Разницы лишь в том, что фильтр должен вернуть полученную переменную, т.е. он фильтрует (изменяет) данные, а событие позволяет запустить пользовательскую функцию в момент срабатывания этого события. Фильтры запускаются функцией apply_filters()
✈ 1 раз = 0.00007с = очень быстро | 50000 раз = 0.03с = скорость света
Хуков нет.
Возвращает
Ничего не возвращает.
Использование
do_action($tag, $arg_a, $arg_b, ...); $tag(строка) (обязательный) Название создаваемого хука. $arg_a Значение аргумента, который будет передан.$arg_b(строка/массив/число/объект/логический) Значение еще одного аргумента...
По умолчанию: аргумент не существует $arg_с(строка/массив/число/объект/логический) Функции можно передавать бесконечно много аргументов...
Примеры
#1. Пример использования
Эту функцию можно использовать в плагинах, темах и т.д., когда нужно внедрится в процесс выполнения кода, откуда-нибудь из другого места. Например, "зацепку" (хук) (do_action) мы установили в плагине, а "цепляться" за нее будем из файла functions.php в тот момент, когда будет срабатывать наша "зацепка".
Допустим, мы использовали такой код в плагине:
Теперь мы может сделать какое-нибудь действие в момент срабатывания функции do_action и при этом описать наше действие можно, например, из файла functions.php, разместив в нем такой код:
Function do_my_hook($a, $b){
// если переданная переменная $a равна true,
// то, например, удалим запись 10
if($a===true)
wp_delete_post(10);
// а тут просто выведем переменную на экран
echo "
".$b; // выведет значение второй переменной
}
// Регистрируем хук через
// add_action($tag, $function_to_add, $priority, $accepted_args);
add_action("my_hook", "do_my_hook", 10, 2);
Действия отличаются от фильтров, тем что передаваемые действием данные, не возвращаются обратно в функцию и не используются там в дальнейшем, а всего-лишь передаются для использования в функции хука.
Код do action : wp-includes/plugin.php WP 5.2.2
do_action($args); array_pop($wp_current_filter); }Одно из главнейших достоинств PHP - то, как он работает с формами HTML. Здесь основным является то, что каждый элемент формы автоматически становится доступным вашим программам на PHP. Для подробной информации об использовании форм в PHP читайте раздел . Вот пример формы HTML:
Пример #1 Простейшая форма HTML
В этой форме нет ничего особенного. Это обычная форма HTML без каких-либо специальных тегов. Когда пользователь заполнит форму и нажмет кнопку отправки, будет вызвана страница action.php . В этом файле может быть что-то вроде:
Пример #2 Выводим данные формы
Здравствуйте,
.
Вам
лет.
Пример вывода данной программы:
Здравствуйте, Сергей. Вам 30 лет.
Если не принимать во внимание куски кода с htmlspecialchars() и (int) , принцип работы данного кода должен быть прост и понятен. htmlspecialchars() обеспечивает правильную кодировку "особых" HTML-символов так, чтобы вредоносный HTML или Javascript не был вставлен на вашу страницу. Поле age, о котором нам известно, что оно должно быть число, мы можем просто преобразовать в integer , что автоматически избавит нас от нежелательных символов. PHP также может сделать это автоматически с помощью расширения filter . Переменные $_POST["name"] и $_POST["age"] автоматически установлены для вас средствами PHP. Ранее мы использовали суперглобальную переменную $_SERVER , здесь же мы точно так же используем суперглобальную переменную $_POST , которая содержит все POST-данные. Заметим, что метод отправки (method) нашей формы - POST. Если бы мы использовали метод GET , то информация нашей формы была бы в суперглобальной переменной $_GET . Кроме этого, можно использовать переменную $_REQUEST , если источник данных не имеет значения. Эта переменная содержит смесь данных GET, POST, COOKIE.
15 years ago
According to the HTTP specification, you should use the POST method when you"re using the form to change the state of something on the server end. For example, if a page has a form to allow users to add their own comments, like this page here, the form should use POST. If you click "Reload" or "Refresh" on a page that you reached through a POST, it"s almost always an error -- you shouldn"t be posting the same comment twice -- which is why these pages aren"t bookmarked or cached.
You should use the GET method when your form is, well, getting something off the server and not actually changing anything. For example, the form for a search engine should use GET, since searching a Web site should not be changing anything that the client might care about, and bookmarking or caching the results of a search-engine query is just as useful as bookmarking or caching a static HTML page.
2 years ago
Worth clarifying:
POST is not more secure than GET.
The reasons for choosing GET vs POST involve various factors such as intent of the request (are you "submitting" information?), the size of the request (there are limits to how long a URL can be, and GET parameters are sent in the URL), and how easily you want the Action to be shareable -- Example, Google Searches are GET because it makes it easy to copy and share the search query with someone else simply by sharing the URL.
Security is only a consideration here due to the fact that a GET is easier to share than a POST. Example: you don"t want a password to be sent by GET, because the user might share the resulting URL and inadvertently expose their password.
However, a GET and a POST are equally easy to intercept by a well-placed malicious person if you don"t deploy TLS/SSL to protect the network connection itself.
All Forms sent over HTTP (usually port 80) are insecure, and today (2017), there aren"t many good reasons for a public website to not be using HTTPS (which is basically HTTP + Transport Layer Security).
As a bonus, if you use TLS you minimise the risk of your users getting code (ADs) injected into your traffic that wasn"t put there by you.
RxGroovy has several Do variants.
- Javadoc:
- Javadoc:

- Javadoc:
The doOnRequest operator (new in RxGroovy 1.1) registers an Action which will be called whenever an observer requests additional items from the resulting Observable. That Action receives as its parameter the number of items that the observer is requesting.
- Javadoc:

- Javadoc:

- Javadoc:

- Javadoc:
- Javadoc:

before
- Javadoc:

after the resulting Observable terminates, whether normally or with an error.
Sample Code
def numbers = Observable.from(); numbers.finallyDo({ println("Finally"); }).subscribe({ println(it); }, // onNext { println("Error: " + it.getMessage()); }, // onError { println("Sequence complete"); } // onCompleted);
1 2 3 4 5 Sequence complete Finally
- Javadoc:
RxJava has several Do variants.
The doOnEach operator allows you to establish a callback that the resulting Observable will call each time it emits an item. You can pass this callback either in the form of an Action that takes an onNext variety of Notification as its sole parameter, or you can pass in an Observer whose onNext method will be called as if it had subscribed to the Observable.
- Javadoc:
- Javadoc:
The doOnNext operator is much like doOnEach(Action1) except that the Action that you pass it as a parameter does not accept a Notification but instead simply accepts the emitted item.
Sample Code
Observable.just(1, 2, 3)
.doOnNext(new Action1
Next: 1 Error: Item exceeds maximum value
- Javadoc:
The doOnRequest operator (new in RxJava 1.1) registers an Action which will be called whenever an observer requests additional items from the resulting Observable. That Action receives as its parameter the number of items that the observer is requesting.
- Javadoc:
The doOnSubscribe operator registers an Action which will be called whenever an observer subscribes to the resulting Observable.
- Javadoc:
The doOnUnsubscribe operator registers an Action which will be called whenever an observer unsubscribes from the resulting Observable.
- Javadoc:
The doOnCompleted operator registers an Action which will be called if the resulting Observable terminates normally, calling onCompleted .
- Javadoc:
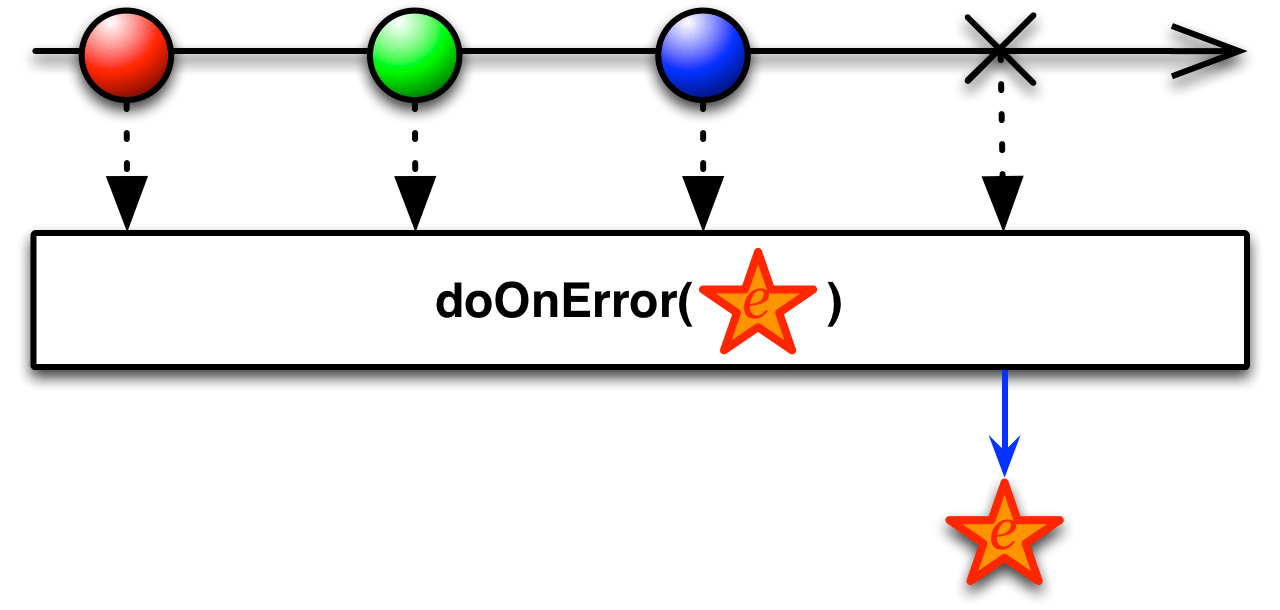
The doOnError operator registers an Action which will be called if the resulting Observable terminates abnormally, calling onError . This Action will be passed the Throwable representing the error.
- Javadoc:
The doOnTerminate operator registers an Action which will be called just before the resulting Observable terminates, whether normally or with an error.
- Javadoc:
finallyDo is deprecated since RxJava 1.1.1, in favor of doAfterTerminate with the same behavior.
The finallyDo operator registers an Action which will be called just after the resulting Observable terminates, whether normally or with an error.
- Javadoc:

The doAfterTerminate operator registers an Action which will be called just after the resulting Observable terminates, whether normally or with an error.
- Javadoc:
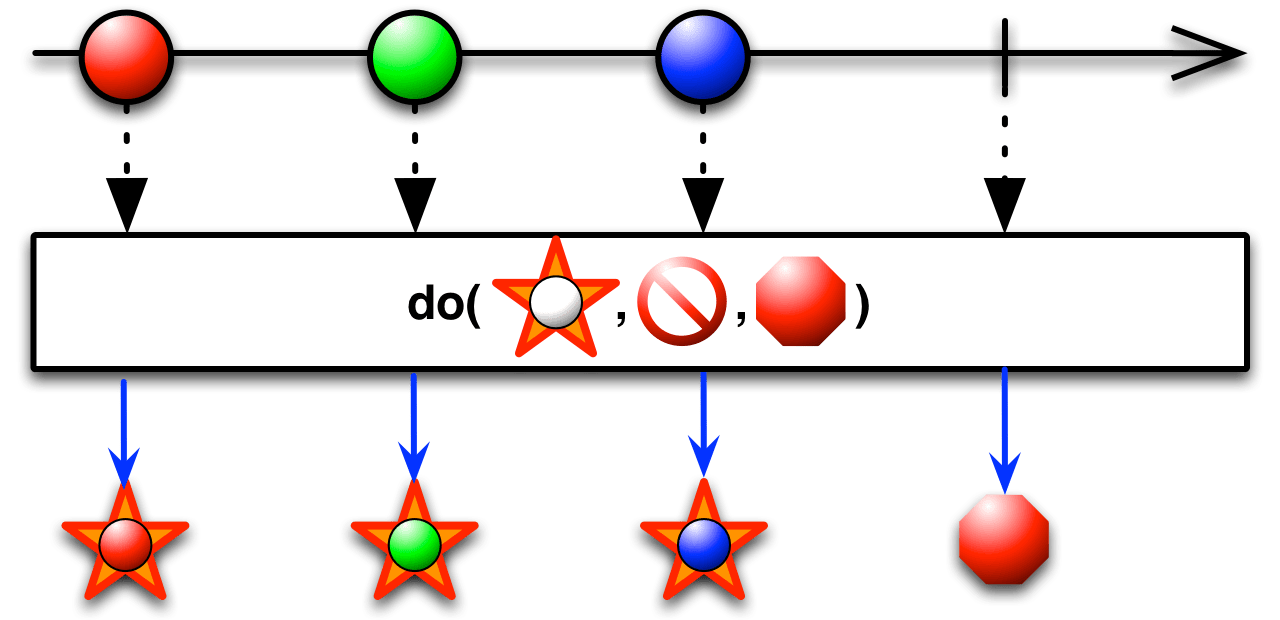
RxJS implements the basic Do operator as do or tap (two names for the same operator). You have two choices for how to use this operator:
- You can pass it an Observer, in which case do / tap will call that Observer’s methods as though that Observer had subscribed to the resulting Observable.
- You can pass in a set of 1-3 individual functions (onNext , onError , and onCompleted) that do / tap will call along with the similarly-named functions of any of its observers.
Sample Code
/* Using an observer */ var observer = Rx.Observer.create(function (x) { console.log("Do Next: %s", x); }, function (err) { console.log("Do Error: %s", err); }, function () { console.log("Do Completed"); }); var source = Rx.Observable.range(0, 3) .do(observer); var subscription = source.subscribe(function (x) { console.log("Next: %s", x); }, function (err) { console.log("Error: %s", err); }, function () { console.log("Completed"); });
/* Using a function */ var source = Rx.Observable.range(0, 3) .do(function (x) { console.log("Do Next:", x); }, function (err) { console.log("Do Error:", err); }, function () { console.log("Do Completed"); }); var subscription = source.subscribe(function (x) { console.log("Next: %s", x); }, function (err) { console.log("Error: %s", err); }, function () { console.log("Completed"); });
Do Next: 0 Next: 0 Do Next: 1 Next: 1 Do Next: 2 Next: 2 Do Completed Completed
RxJS also implements doOnNext or tapOnNext (two names for the same operator). It is a specialized form of Do that responds only to the onNext case, by calling a callback function you provide as a parameter. You may also optionally pass a second parameter that will be the “ this ” object from the point of view of your callback function when it executes.
Sample Code
var source = Rx.Observable.range(0, 3) .doOnNext(function () { this.log("Do Next: %s", x); }, console); var subscription = source.subscribe(function (x) { console.log("Next: %s", x); }, function (err) { console.log("Error: %s", err); }, function () { console.log("Completed"); });
Do Next: 0 Next: 0 Do Next: 1 Next: 1 Do Next: 2 Next: 2 Completed
RxJS also implements doOnError or tapOnError (two names for the same operator). It is a specialized form of Do that responds only to the onError case, by calling a callback function you provide as a parameter. You may also optionally pass a second parameter that will be the “ this ” object from the point of view of your callback function when it executes.
Sample Code
var source = Rx.Observable.throw(new Error()); .doOnError(function (err) { this.log("Do Error: %s", err); }, console); var subscription = source.subscribe(function (x) { console.log("Next: %s", x); }, function (err) { console.log("Error: %s", err); }, function () { console.log("Completed"); });
Do Error: Error Error: Error
RxJS also implements doOnCompleted or tapOnCompleted (two names for the same operator). It is a specialized form of Do that responds only to the onCompleted case, by calling a callback function you provide as a parameter. You may also optionally pass a second parameter that will be the “ this ” object from the point of view of your callback function when it executes.
Sample Code
var source = Rx.Observable.range(0, 3) .doOnCompleted(function () { this.log("Do Completed"); }, console); var subscription = source.subscribe(function (x) { console.log("Next: %s", x); }, function (err) { console.log("Error: %s", err); }, function () { console.log("Completed"); });
Next: 0 Next: 1 Next: 2 Do Completed Completed

RxJS also implements a finally operator. It takes a function that will be called after the resulting Observable terminates, whether normally (onCompleted) or abnormally (onError).
Sample Code
var source = Rx.Observable.throw(new Error()) .finally(function () { console.log("Finally"); }); var subscription = source.subscribe(function (x) { console.log("Next: " + x); }, function (err) { console.log("Error: " + err); }, function () { console.log("Completed"); });
Error: Error Finally
do / tap , doOnNext / tapOnNext , doOnError / tapOnError , doOnCompleted / tapOnCompleted , and finally are found in each of the following distributions:
- rx.js
- rx.all.js
- rx.all.compat.js
- rx.compat.js
- rx.lite.js
- rx.lite.compat.js
RxPHP implements this operator as do .
Invokes an action for each element in the observable sequence and invokes an action upon graceful or exceptional termination of the observable sequence. This method can be used for debugging, logging, etc. of query behavior by intercepting the message stream to run arbitrary actions for messages on the pipeline. When using do, it is important to note that the Observer may receive additional events after a stream has completed or errored (such as when using a repeat or resubscribing). If you are using an Observable that extends the AbstractObservable, you will not receive these events. For this special case, use the DoObserver. doOnNext, doOnError, and doOnCompleted uses the DoObserver internally and will receive these additional events.
Sample Code
//from https://github.com/ReactiveX/RxPHP/blob/master/demo/do/do.php $source = \Rx\Observable::range(0, 3) ->do(function ($x) { echo "Do Next:", $x, PHP_EOL; }, function (Throwable $err) { echo "Do Error:", $err->getMessage(), PHP_EOL; }, function () { echo "Do Completed", PHP_EOL; }); $subscription = $source->subscribe($stdoutObserver);
Do Next:0 Next value: 0 Do Next:1 Next value: 1 Do Next:2 Next value: 2 Do Completed Complete!
RxPHP also has an operator doOnError .
Sample Code
//from https://github.com/ReactiveX/RxPHP/blob/master/demo/do/doOnError.php $source = \Rx\Observable::error(new Exception("Oops")) ->doOnError(function (Throwable $err) { echo "Do Error:", $err->getMessage(), PHP_EOL; }); $subscription = $source->subscribe($stdoutObserver);
Do Error:Oops Exception: Oops
RxPHP also has an operator doOnCompleted .
Sample Code
//from https://github.com/ReactiveX/RxPHP/blob/master/demo/do/doOnCompleted.php $source = \Rx\Observable::empty() ->doOnCompleted(function () { echo "Do Completed", PHP_EOL; }); $subscription = $source->subscribe($stdoutObserver);
Do Completed Complete!
RxPHP also has an operator finally .
Will call a specified function when the source terminates on complete or error.
Sample Code
//from https://github.com/ReactiveX/RxPHP/blob/master/demo/finally/finally.php Rx\Observable::range(1, 3) ->finally(function() { echo "Finally\n"; }) ->subscribe($stdoutObserver);
Next value: 1 Next value: 2 Next value: 3 Complete! Finally
//from https://github.com/ReactiveX/RxPHP/blob/master/demo/finally/finally-error.php Rx\Observable::range(1, 3) ->map(function($value) { if ($value == 2) { throw new \Exception("error"); } return $value; }) ->finally(function() { echo "Finally\n"; }) ->subscribe($stdoutObserver);
Next value: 1 Exception: error Finally
Мы создали фундамент для будущего плагина, который распознает система WordPress. Сегодня мы займемся непосредственно изменением базового функционала системы.
Поможет нам в этом система «хуков» (hooks), «событий» (actions) и фильтров (filters). Эти три понятия и есть основа каждого плагина для WordPress.
Hooks
В WordPress есть два типа хуков:
- Action hook: помечает место в коде, которое выполняет определенное действие, например, необходимо внести какие-либо данные и сохранить в базе.
- Filter hook: помечает фильтр, который будет изменять какое-либо значение (переменную), так что в дальнейшем код будет использовать модифицированное значение.
Actions
Работа с событиями (actions)
Общая логика управления событиями в WordPress проста:
- Пометить место, где действие должно выполниться с помощью хука (action hook) с необходимыми параметрами.
- Создать функцию, которая будет выполнять нужные действия, используя параметры переданные хуком.
- Зарегистрировать событие, которое будет выполняться при срабатывании хука, с определенным приоритетом.
- Когда WordPress загружает страницу и находит hook, система выполнит все функции, которые зарегистрированы на этот хук.
Для выполнения первого пункта система предоставляет функцию ‘do_action’:
Do_action($tag, $arg_1, $arg_2, ... , $arg_n);
Она принимает следующие аргументы: $tag – название “хука”, $arg_1, $arg_2, … , $arg_n – параметры, с которыми будет вызвана функция. Аргументов может быть любое количество, либо 0.
Система сама по себе имеет много уже определенных хуков:
Do_action("init");
Это очень простой пример без дополнительных аргументов. Данных хук срабатывает, когда большая часть системы уже настроена и пришло время создавать собственные объекты, рубрики, посты и т.п.
Do_action("save_post", $post_id, $post);
В этом примере хук срабатывает при сохранении записи с двумя аргументами post_id — идентификатор записи и post — сама запись.
Создание хуков доступно любому разработчику для создания собственного плагина (или темы). Благодаря этому мы имеем мощный инструмент для управления поведением системы.
Do_action("my_truly_custom_hook");
Когда мы создали хук и написали функцию, нам необходимо зарегистрировать функцию с помощью «add_action»
Add_action($tag, $function_to_add, $priority, $accepted_args_number);
Функция ‘add_action’ принимает два обязательных параметра: $tag: название соответствующего хука и $function_to_add: имя функции, которую необходимо вызвать. Другие два параметра дополнительные: $priority: целочисленная переменная, которая определяет порядок выполнения функции (по-умолчанию — 10), $accepted_args_number: количество аргументов, которое принимает функция (по-умолчанию — 1).
Рассмотрим пример, чтобы понять весь процесс. Допустим, мы хотим добавить небольшое уведомление внизу нашего сайта. Мы можем использовать хук ‘wp_footer’ для этого, потому что он является обязательной частью кода, который использует каждая тема.
Function msp_helloworld_footer_notice(){ echo "
В этом примере мы создали функцию, которая просто выводит разметку для оповещения и зарегистрировали её в ‘wp_footer’. Как только мы добавим этот код в файл нашего плагина (см. предыдущий ) мы увидим результат на странице:
Оповещение плагина WordPress
Работа с фильтрами (filters)
Фильтры работают по той же схеме, что и события. Но фильтры не просто выполняют определенный кусок кода, они изменяют значения, переданные им хуком. Это означает, что каждый фильтр имеет связанное с ним значение (переменную), с которым он работает.
Функция-фильтр будет принимать это значение и преобразовывать его для дальнейшего использования. Хуки для фильтров немного отличаются от хуков для событий (action hooks).
Apply_filters($tag, $value_to_filter, $arg_1, $arg_2, ... , $arg_n);
Функция ‘apply_filter’ создает хук для фильтра с именем $tag и обязательным параметром $value_to_filter (он может быть пустым, но должен быть объявлен). Остальные аргументы необязательны работают так же как и для событий.
Filter_function($value_to_filter, $arg_1, $arg_2, ... , $arg_n){ //фильтр return $value_to_filter; //значение необходимо вернуть }
Это «скелет» фильтра, который демонстрирует, что фильтр должен:
- принимать хотя бы 1 аргумент;
- возвращать модифицированное значение.
Функция ‘add_filter’ регистрирует функцию с названием, содержащимся в $function_to_add для хука $tag. Остальные аргументы - $priority и $accepted_args — работают так же как и у хуков для событий.
Рассмотрим пример: обычная для плагина задача — добавить что-нибудь в конец поста. Если подробнее рассмотреть функцию ‘the_content’, которая используется для вывода содержимого записи, мы найдем такой хук:
$content = apply_filters("the_content", $content);
Используя его мы можем легко добавить что-либо в конец поста.
Function msp_helloworld_post_footer($content) { $content .= "
"; return $content; } add_filter("the_content", "msp_helloworld_post_footer", 100);Обратите внимание, что мы используем большое число для приоритета, что убедиться, что до выполнения ‘msp_helloworld_post_footer’ все стандартные фильтры отработают. После включения кода в наш плагин мы увидим результат:

Как найти хук
Теперь нам понятно, что для выполнения определенных действий, нам необходимо знать о существующих хуках.
«Кодекс» WordPress предоставляет списки хуков для фильтров и событий Action Reference и Filter Reference .
Дополнительные действия с хуками
Так же как и добавить, хук можно удалить, используя похожий синтаксис.
Удалить события можно так:
Remove_action($tag, $function_to_remove, $priority, $accepted_args); remove_all_actions($tag, $priority);
Как вы догадались, ‘remove_action’ удаляет определенное событие, зарегистрированное для данного хука (необходимо правильно указать приоритет и количество аргументов, так как было указано при регистрации), и ‘remove_all_actions’ помогает удалить все события, зарегистрированные для хука (если приоритет опущен, функция удалит все события).
Фильтры можно удалять так же:
Remove_filter($tag, $function_to_remove, $priority, $accepted_args); remove_all_filters($tag, $priority);
API для плагинов в WordPress также предоставляет функции для проверки зарегистрирована ли функция для данного хука:
Has_action($tag, $function_to_check); has_filter($tag, $function_to_check);
Обе функции проверяют зарегистрирована ли данная функция для хука и возвращают true в случае успеха, иначе flase. Внутри функции у нас есть возможность проверить, что хук вызвал её:
If("hook_to_check_name" === current_filter()){}
Несмотря на название ‘current_filter’ работает не только с фильтрами но и с событиями.
Нетривиальный пример
Оживим «скелет» нашего плагина, который мы подготовили в прошлом уроке.
Заполним файл ‘core.php’ (главная часть нашего плагина, в которой сосредоточена основная часть функций) кодом, который решает задачу, которая реально может возникнуть в ходе работы. Для её решения мы будем использовать actions и filters.
Пусть ваш WordPress сайт принимает посты разных авторов от гостей, но не позволяет создавать аккаунты. Это значит, что пользователь, который опубликовал пост и реальный автор — разные люди и нам необходимо убедиться, что автор будет указан в посте. Мы можем сделать это с помощью таксономии.
Создадим собственную таксономию для обработки имя автора и его короткой биографии. Мы сможем использовать имя автора как другие термины таксономии (теги, например) в посте. Код:
/** регистрация фильтров и событий **/ function msp_helloworld_init(){ add_action("init", "msp_helloworld_taxonomies"); add_filter("the_content", "msp_helloworld_author_block_filter"); add_filter("post_class", "msp_helloworld_post_class"); } add_action("plugins_loaded", "msp_helloworld_init"); /** taxonomy **/ function msp_helloworld_taxonomies(){ $args = array("labels" => array("name" => "Guest authors", "singular_name" => "Guest author"), "show_in_nav_menus" => false); register_taxonomy("gauthor", array("post"), $args); } /** разметка блока автора **/ function msp_helloworld_author_block(){ global $post; $author_terms = wp_get_object_terms($post->ID, "gauthor"); if(empty($author_terms)) return; $name = stripslashes($author_terms->name); $url = esc_url(get_term_link($author_terms)); $desc = wp_filter_post_kses($author_terms->description); $out = "
"; return $out; } /** добавить разметку в конец поста **/ function msp_helloworld_author_block_filter($content){ if(is_single()) $content .= msp_helloworld_author_block(); return $content; } /** добавить CSS class к посту **/ function msp_helloworld_post_class($post_class){ global $post; $author_terms = wp_get_object_terms($post->ID, "gauthor"); if(!empty($author_terms)){ $post_class = "gauthor"; } return $post_class; }Как видите, мы создали функцию для регистрации собственной таксономии и привязали её к хуку ‘init’. После мы создали шаблон, отвечающий за отображение блока автора, используя функцию WordPress ‘wp_get_object_terms’. После мы вставили блок с информацией об авторе в конец поста с помощью фильтра ‘the_content’. И, наконец, мы добавили собственный CSS класс. Результат работы: